How To Install OpenJDK 12 On macOS
Explains the steps required to install OpenJDK 12 on Mac and getting started with Java programming using Hello World.
This tutorial provides all the steps required to install Java 12 on macOS. The steps should be the same for other versions of macOS.
Important Notes: Oracle has already announced that the Java updates and new releases available on its official site are not free from 16th April 2019 onwards. The consumer has to purchase a commercial license unless and otherwise Java is used for personal and development purposes. We can still use Java for personal, development, and commercial usage without purchasing any license by using the OpenJDK distributed by Oracle under the GNU General Public License, version 2, with the Classpath Exception, and available on http://jdk.java.net.
This tutorial covers the installation of OpenJDK on macOS Sierra. The same steps can be followed for macOS Mojave and macOS Catalina.
Notes: You may also be interested in How To Install OpenJDK 14 On Mac, How To Uninstall Java From Mac, and How To Switch Java Version On Mac.
Download JDK
Open the JDK 12 GA Release site and download the distribution for macOS systems as shown in Fig 1.
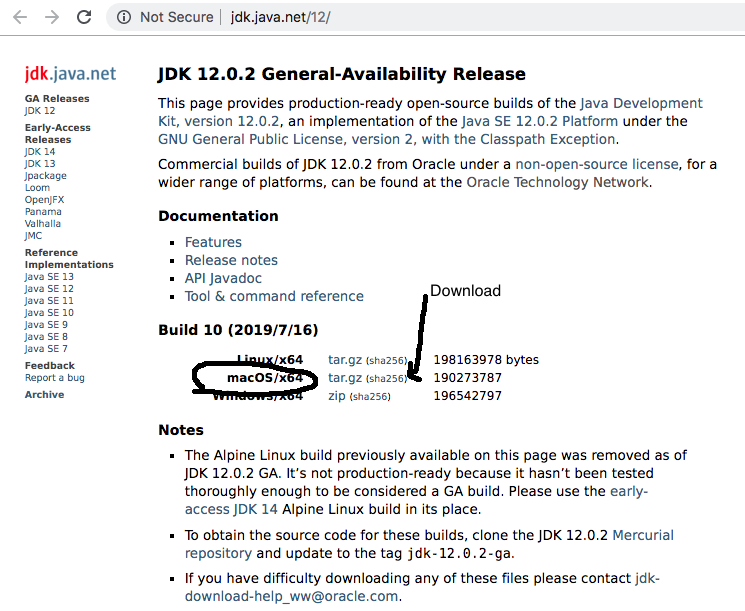
Fig 1
Install JDK
The default location used by macOS to search for the available JDK
# List installed JDKs
/usr/libexec/java_home -V
It will list down the available JDKs as shown in Fig 2. In my case, none of the JDK was installed while writing this tutorial.

Fig 2
Now, install the OpenJDK downloaded in the previous step using the commands as shown below.
# Move to the download location
cd ~/Downloads

# Extract the download
tar -xf

# Install the JDK
sudo mv jdk-12.0.1.jdk /Library/Java/JavaVirtualMachines/
Now we will verify the installation as shown below.
# Check Java version
java -version

# It should show the version installed by us
openjdk version "12.0.2" 2019-07-16
OpenJDK Runtime Environment (build 12.0.2+10)
OpenJDK 64-Bit Server VM (build 12.0.2+10, mixed mode, sharing)
You might be required to switch the active JDK in case it does not reflect the OpenJDK 12. We can also check the list of installed JDKs as shown below.
# List installed JDKs
/usr/libexec/java_home -V

# It will output the list of the available JDKs
Matching Java Virtual Machines (1):
    12.0.2, x86_64:	"OpenJDK 12.0.2"	/Library/Java/JavaVirtualMachines/jdk-12.0.2.jdk/Contents/Home

/Library/Java/JavaVirtualMachines/jdk-12.0.2.jdk/Contents/Home/
It should list the OpenJDK 12 installed by us. This is how we can install and verify Java on macOS.
Switch JDK
We can switch between the multiple JDKs using the command as shown below.
# List installed JDKs
/usr/libexec/java_home -V

# Switch active JDK
export JAVA_HOME=`/usr/libexec/java_home -v <version>`

# Example
export JAVA_HOME=`/usr/libexec/java_home -v 1.8.0_201`
This switches the Java version for the active shell. If you close the terminal and again check the Java version by opening a new terminal, your changes won't be reflected. You can follow How To Switch Java Version On Mac to system-wide update the Java version.
Getting started with Java - Hello World
In this section, we will write our first program in Java using the nano editor.
>sudo mkdir /programs/java
>cd /programs/java
>nano HelloJava.java
Now write the first Java program as shown in Fig 3, save the program and exit the editor.
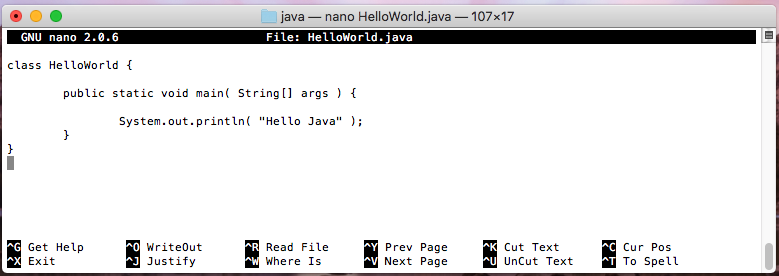
Fig 3
Use the javac and java to compile and execute the program as shown below.
// Compile the program
javac HelloWorld.java

// Execute the program
java HelloWorld

// Program output
Hello World
These are the basic steps to write, compile, and execute Java programs.


